 How-to
Small Kitchen Storage Optimization: 7 Techniques That Work
Last Updated: October 23, 2026
Quick Summary
Small kitchen storage optimization starts with decluttering to free 20-30% of capacity, then maximizing vertical space with floating shelves and hooks, organizing cabinets with pull-out shelves and risers, and keeping 60-70% of countertops clear. Strategic organization and multipurpose furniture can transform a cramped kitchen into an efficient workspace without requiring a full renovation.
- Decluttering alone often frees up 20-30% of storage capacity before buying any organizers.
- Install floating shelves 12-18 inches above countertops and wall-mounted pot racks to maximize vertical space.
- Pull-out shelves cost $30-$80 per shelf and typically free up a full cabinet's worth of usable space.
- Use clear, stackable containers for dry goods; switching from round to square containers gains roughly 15-20% usable shelf area.
- Aim to keep 60-70% of countertops clear at all times, storing daily-use items only on the counter.
Table of Contents
- Audit Your Kitchen and Declutter First
- Maximize Vertical Space With Wall-Mounted Storage
- Small Kitchen Cabinet Organization Strategies
- Small Kitchen Organization Tips for Pantries and Corners
- Clear Countertops and Improve Kitchen Layout Ideas
- Create Work Zones and Traffic Flow
- Measure, Plan, and Execute Your Storage Upgrades
- Frequently Asked Questions
Audit Your Kitchen and Declutter First
Small kitchen storage optimization starts with knowing what you actually have.
Pull everything out of every cabinet, drawer, and shelf. If you haven't used a gadget in a year, it's taking space that could hold something useful.
Sort items into three piles: keep, donate, and trash. Keep only what you use regularly or genuinely love. Donate duplicate tools, expired spices, and broken items. This ruthless approach is where small kitchen storage optimization actually begins.
Once you've decluttered, measure cabinet dimensions, wall heights, and shelf depths, and photograph the layout so you know what fits before you buy.
Maximize Vertical Space With Wall-Mounted Storage
Vertical space is your biggest untapped asset in a small kitchen, yet most homeowners ignore the walls above eye level.
Install Floating Shelves and Hanging Racks
Floating shelves add storage without visual bulk, holding everyday items within arm's reach and making your kitchen feel more open than traditional cabinets.
Install them 12-18 inches above the countertop, spaced 16-24 inches apart, for daily dishes, glasses, and cookbooks.
A wall-mounted pot rack frees two or three cabinet shelves immediately. Mount it above the stove or near your cooking zone, and make sure it's secure, pot racks hold significant weight.
Open shelving works best when items stay visually consistent, group by color or type and store matching plates together so the space feels intentional.
Use Hooks and Pegboards for Daily Items
Hooks are the most underused storage tool in small kitchens. A two-dollar hook holds a mug, towel, or utensil.
Install hooks inside cabinet doors for measuring spoons, pot holders, and towels, and on walls for frequently used utensils.
Pegboards offer flexible, adjustable storage.
The rule for hooks and pegboards: store only items you use at least once a week. Seasonal or occasional items belong in cabinets.
Small Kitchen Cabinet Organization Strategies
Your cabinets hold more than you think. Most people pack items randomly and lose track of what they have. Strategic organization doubles usable storage without new cabinets.
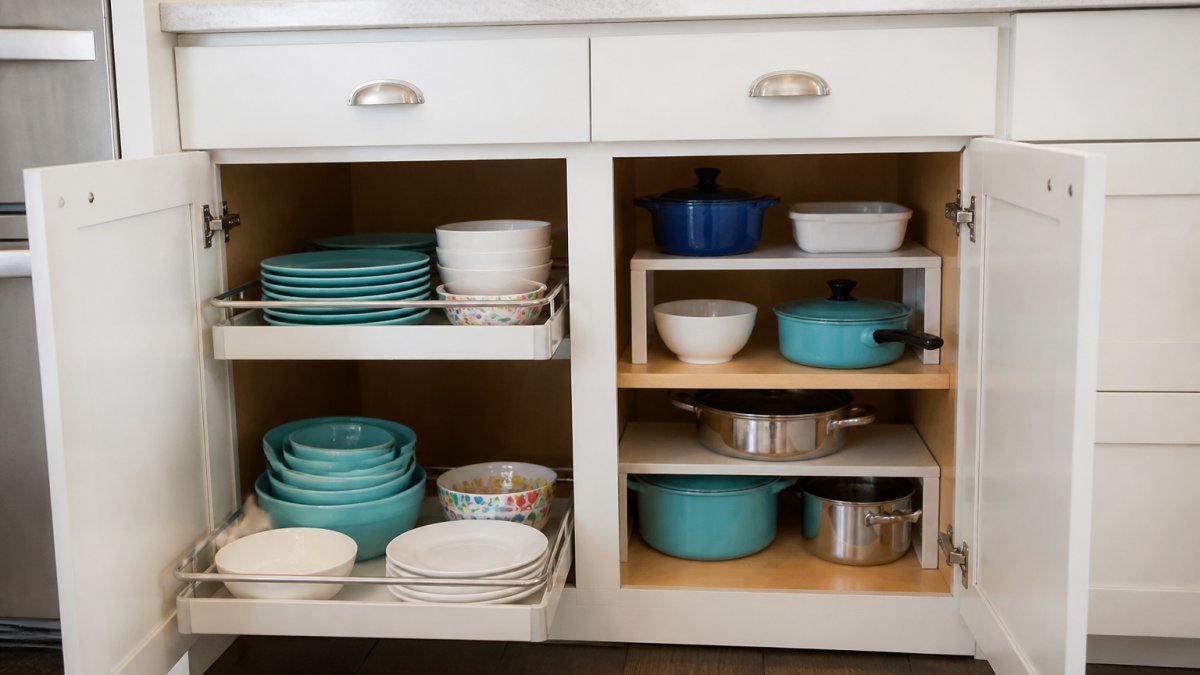
Install Pull-Out Shelves and Deep Drawers
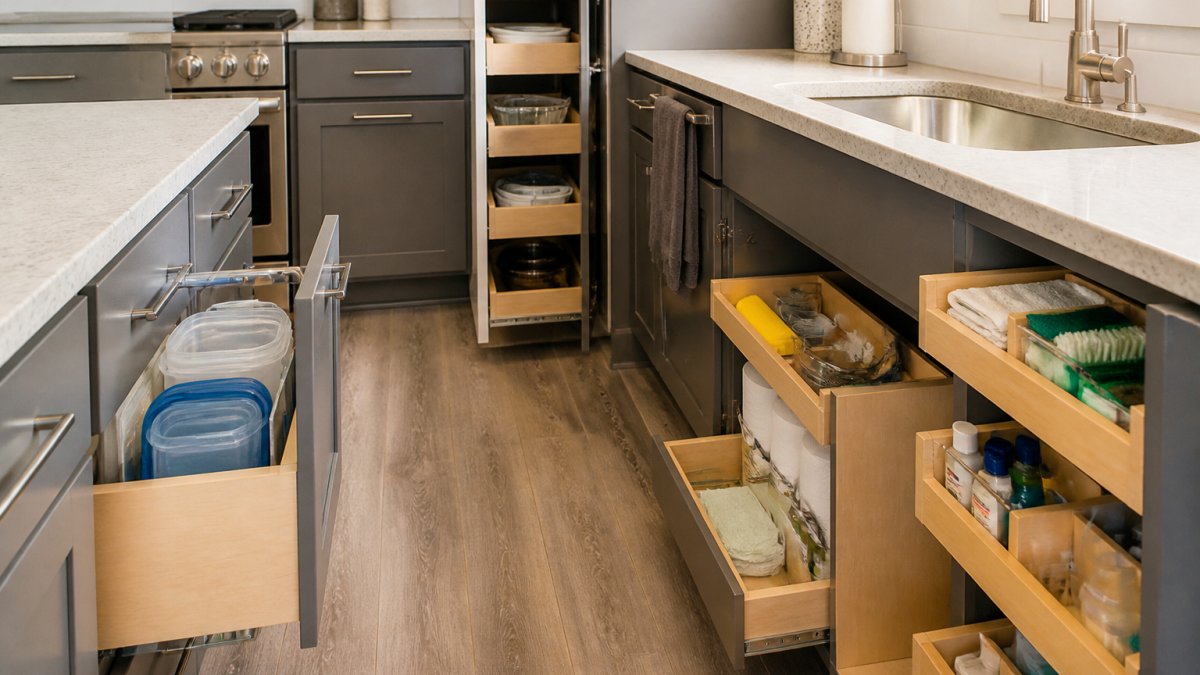
Pull-out shelves transform deep cabinets into accessible storage. Standard shelves sit 12-18 inches deep, so you can't reach the back without removing everything in front.
They slide out like drawers, cost $30-$80 per shelf, and take an hour to install. One pull-out typically frees up a full cabinet's worth of usable space.
Deep drawers work the same way: instead of stacking pans three high, lay them flat and see every pan at once. They cost more than pull-out shelves but organize cookware and baking supplies better.
Use Risers, Dividers, and Drawer Organizers
Risers are plastic or wood stands that stack items vertically. Stand plates upright instead of stacking them flat: you see each one instantly and use 40% less shelf space.
Drawer dividers separate utensils and small items so nothing gets lost. A divided drawer holds three times more than a messy one, and dividers cost $10-25 and install in minutes.
Shelf organizers create zones within a cabinet: bins for spices, containers for foil and plastic wrap, baskets for snacks.
Small Kitchen Organization Tips for Pantries and Corners
Pantries and corner cabinets are where small kitchen storage optimization gets specific. These spaces are goldmines or black holes depending on whether you can see what you have, reach it without unloading the front row, and whether the solution fits your cabinet dimensions.
Optimize Pantry Access and Visibility
A pantry is only useful if you can see what you have. Most fail because items get buried in the back and expire before anyone finds them.
Measure your pantry's usable depth first.
Use clear, stackable containers for dry goods, labeled with contents and date.
Apply a reach-zone rule: daily items between shoulder and hip height, weekly items at eye level or just below, occasional or bulk items on top and bottom shelves.
Reclaim Awkward Corner Spaces
Corner cabinets are notoriously hard to use. Items disappear into the back corners and you forget you own them.
A corner carousel (lazy Susan) is the lowest-effort option.
Pull-out corner systems (often called blind-corner pull-outs) cost more, roughly $150-$400, but they bring the entire corner out to you instead of requiring a reach.
Corner wall space above the counter is often wasted.
Clear Countertops and Improve Kitchen Layout Ideas
Countertop clutter makes small kitchens feel smaller, every item takes working space and makes the room feel chaotic. Clearing counters and improving layout are two different jobs, and the right approach depends on your kitchen's shape and whether you can make permanent changes.
Set a Countertop Target and Choose Compact Appliances
A practical target is to keep 60-70% of your countertop clear at all times, leaving only items you use daily.
Choose compact appliances deliberately.
Mounting the microwave on a wall or under a cabinet frees a meaningful block of counter space, but check the mounting bracket's weight rating and the cabinet's ability to carry it.
Light-colored countertops and walls make small kitchens feel larger, and clutter is more visible on light surfaces, which nudges you to keep them clear.
Match the Layout to Your Kitchen's Shape
Layout advice only works when it matches the room. Here is how the main small-kitchen shapes differ:
- Galley: Two parallel runs with a walkway between. Keep the walkway clear and use the wall above each run for vertical storage. The work triangle is naturally efficient here, so prioritize keeping the path between sink, stove, and refrigerator unobstructed rather than adding furniture that narrows it.
- L-shaped: The corner is the pressure point. Use a corner carousel or pull-out in the base corner, and reserve the long leg for prep and the short leg for cooking. A rolling cart can extend the short leg temporarily without blocking the corner.
- One-wall: Everything shares a single run, so vertical storage and stackable, labeled containers do the heavy lifting. A wall-mounted folding table or a slim rolling island gives you temporary prep space that tucks away.
- U-shaped or peninsula: Watch the aisle widths. A common guideline is to keep primary walkways at least 36 inches wide and secondary paths at least 32 inches; storage that narrows these below that turns a functional kitchen into a squeeze.
For renters, favor reversible options: tension rods, over-the-door racks, command-strip hooks rated for the item's weight, freestanding shelving, and rolling carts. These deliver most of the storage gain of permanent installs without drilling, and they move with you.
Add Multipurpose Furniture and Portable Islands
A small rolling cart or portable island adds counter and storage space without permanent installation. It slides out when you need it and tucks away when you don't.
A kitchen table that doubles as prep space saves counter room.
Wall-mounted folding tables work in tight spaces. They fold up completely when not in use, taking up almost no space. Check the hinge and bracket weight rating before loading it with appliances, and mount into studs where possible.
Create Work Zones and Traffic Flow
Small kitchens work better when you organize them by function.
Create a prep zone near your cutting board and sink. Keep knives, cutting boards, and prep tools together.
This organization reduces movement and makes cooking faster. You don't hunt for items scattered across three cabinets.
Traffic flow matters in small kitchens. If your stove, sink, and refrigerator form a triangle, keep that path clear.
Measure, Plan, and Execute Your Storage Upgrades
Once you've decluttered and identified your storage gaps, plan upgrades carefully. Measure twice, buy once.
Measure the exact dimensions of spaces where you want to install shelves, racks, or organizers.
Research products before buying. Read reviews from people with similar kitchen sizes. Watch installation videos.
Start with the highest-impact upgrades first.
Test solutions before committing.
At Revo Kitchen and Bath, we understand that small kitchen storage optimization often leads to bigger questions about kitchen layout, countertop space, and overall functionality.
Small kitchen storage optimization doesn't require a full renovation.
Frequently Asked Questions
How can you make more storage space in a small kitchen?
Small kitchen storage optimization begins with vertical space. Install floating shelves, wall-mounted racks, and hooks to use underutilized wall area. Upgrade cabinets with pull-out shelves and deep drawers, use shelf risers to stack items efficiently, and reclaim corner spaces with corner storage solutions. Clear countertops by storing appliances in cabinets and using pull-out pantry systems. These techniques can increase usable storage by 20-30% without expanding the kitchen footprint.
Are pull-out shelves worth it in a small kitchen?
Yes. Pull-out shelves make deep cabinets accessible and prevent items from getting lost in the back. They reduce the time spent digging through storage and help you see exactly what you have, reducing duplicate purchases and waste. For small kitchens where every inch counts, pull-out shelves improve space efficiency and daily workflow significantly. The investment typically pays for itself through better organization and reduced food waste.
What storage solutions work best in a small kitchen?
The most effective solutions combine vertical storage, cabinet optimization, and layout improvements. Wall-mounted shelves and hanging baskets use ceiling-height space. Cabinet organizers, drawer dividers, and pull-out systems maximize interior storage. Corner storage solutions address awkward spaces. Compact, appropriately sized appliances and multipurpose furniture reduce clutter. Lighting and glass cabinet doors create visual space. A practical audit to declutter first ensures every storage solution holds items you actually use.
How should you organize cabinets in a small kitchen?
Start by removing everything and assessing what you use regularly. Group similar items together (dishes, glasses, cookware, pantry goods). Use shelf risers to double vertical capacity, install drawer organizers for utensils and tools, and add dividers to prevent stacking chaos. Store frequently used items at eye level and within arm's reach. Use clear containers for pantry items so you see what you have. Reserve upper cabinets for lighter, less-used items. This workflow prevents clutter from returning and makes daily cooking more efficient.